

PCVR
Controls
Saving
Custom Art
Misc.
Clone Here Songs Highway
Advanced RAW .MID File Highway
MIDI
Meta Quest
Controls
Saving
Augmented Reality (Passthrough)
Misc.
Clone Hero Songs Note Highway
Advanced RAW .MID File Highway
If you have an issue and cannot find the solution here. Join the Discord.
AI Assistant: Trouble finind something? Ask the VR Drums Ult. Chatbot to help with your questions.
Clone Hero Controller MIDI Kit Setup (PCVR)

This is not the tutorial for playing Clone Hero song folders in-game, but rather for using the VR drum kit as a MIDI controller, just like streamers do online live with their electronic drums kits to control the Clone Hero application itself. You can use the VR drum kit and SteamVR's desktop overlays in-game to play the desktop PC version of Clone Hero while using the VR drum kit as a drum controller. What you will need for this is listed below and free.
What You'll Need
1.) PC MIDI setup on WIndows ---> (MIDIMapper) and (VirtualMIDISynth)
2.) Active MIDI port on your PC. Don't have one? Make a virtual MIDI input port ---> (loopMIDI)
3.) Clone Hero installed on active PC.
1.) Install loopMIDI (Create A Virtual MIDI Port)
Install the loopMIDI program. We will select and use this virtual MIDI port in Clone Hero later. When the loopMIDI application is first started there are no virtual MIDI ports. Click the "+" button at the lower left of the application to create a virtual MIDI port. The virtual port is now ready and named "loopMIDI Port".

2.) Install VirtualMIDISynth
Most computers now days come with no support for MIDI on the OS. Install VirtualMIDISynth. Once installed right click the VirtualMIDISynth icon in the Windows task bar and click Configuration.

Click the MIDI Mapper tab and set the Default MIDI out device. This we will set to loopMIDI Port, the virtual MIDI port we just created in the steps above. You can now close this application, the virtual port is ready and we will later select it in Clone Hero.

3.) Start VR Drums Ult.
Start SteamVR and then start VR Drums Ultimate Streamer. Enter the main menu and find the MIDI tab. Check the checkbox to enable MIDI support and allow the game to send out MIDI notes. Take off your headset and you will see on your PC monitor screen the MIDI settings for VR Drums Ult. We only need to select where we will be sending MIDI notes too, use your mouse and select "CoolSoft MIDIMapper". or loopMIDI depending your setup. Send a test MIDI note out anytime using the "Note On" button to test if you are sending to the correct device. If received you will see the MIDI notes in the "Receive MIDI". These notes were processed and received.

4.) Start Clone Hero
Install Clone Hero if you haven't yet. Start Clone Hero. When the game starts up it can be a little difficult to control without having a guitar controller connected but you can use your PC's keyboard. Press ENTER, the Player1 options will appear. Use the arrow keys on your keyboard to navigate the menu and the A key to select.
Select Controller...
Select Drums...
Select Input...
Once you select input scroll up or down with the arrow keys on your keyboard and find the "loopMIDI Port" the virtual MIDI port we made earlier with loopMIDI. Esc key to go back.
Now we have the MIDI port "loopMIDI Port" assigned for VR Drums to output notes to and Clone Hero to receive them.
Back to VR Drums Ult.
Now we have Clone Hero MIDI port setup, we will need a way to see our PC screen inside of VR, so that we can see the Clone Hero game while in VR Drums. To do this while you are in VR Drums Ult. on your left controller, press the Menu button. SteamVR's menu will appear. In the lower left click the Desktop button. You will see your PC desktop screen now in-game. Mount the screen. Mounting/Pinning the screen is required so that when we exit the SteamVR menu, our desktop screen will still be placed in our game when we exit the Steam menu. Move the screen anywhere you want by pressing the move button at the bottom of the screen with your VR controllers grip/trigger button. Once you have the screen where you like we need to "Pin" the screen by pressing the "pin/mount" button at the bottom of the screen.
Now that our screen is pinned it will remain in game, exit the Steam menu by pressing your left controllers Menu button again.
Setting Up Drums In Clone Hero
Lets go back to Clone Hero. Enter the player menu we were in before, press the enter key and use the keyboards arrow keys to find the controller setup.
Clone Hero will then ask you to hit what drum you want to use for each color. We will have our VR headset on for this step and navigate and see the Clone Hero menu with our pinned desktop screen in-game. Below is a color legend of the standard colors used in Clone Hero and a standard setup, but you can hit whatever drum you want to use if you wish.
Yellow Hat
Green Crash
Red Snare
Blue Tom/Ride
Enable "Guides" in the drum builder tab. It will highlight each drum and cymbal for you with the correct Clone Hero note color.


Calibration Tool
Click anywhere in the Clone Hero menu/background to go back to the main menu.
In the main menu select Settings. Select CALIBRATION TOOL.
When the calibration tool starts, you will hit the VR drums in VR Drums Ult. to the beat Clone Hero starts playing.
The VR drums are now set to the color notes that you hit and will be used in Clone Hero, so the VR drums will now also work as navigating the menus (blue, yellow, red, green keys) to the drums you set, so be careful not to hit them again after the calibration process or it will make you do it again. When you are done press the A key on your keyboard to enter the next calibration step.
The second calibration step will have you hit the VR drum kit in VR Drums Ult. to an scrolling visual note highway. Align the incoming lines with the beat/lines. Play naturally how you would in-game for best results.
When you are done press the A key on your keyboard. Calibration is done and offset is now set for you.
Auto calibration is a close sync. Enter the Clone Hero main menu > Settings > Adjust the video delay % to align your hits if the auto calibration is off by a bit. You are ready to play.
Recording Process
You can capture both the VR Drums Ult. screen and Clone Hero in OBS. Capture two separate windows side by side or see other options below.
If you want to capture your VR view that includes the SteamVR pinned Clone Hero desktop screen, you can use Oculus Mirror. https://developers.meta.com/horizon/documentation/native/pc/dg-compositor-mirror/
Oculus mirror will capture everything you see in your VR headset, including your pinned PC desktop screens. This method is shown below in an example image. Capture the Oculus Mirror window in OBS.
MIDI Setup (PCVR) and DAW
There are multiple different methods you can use to communicate MIDI with VRDUS and uses like controlling Clone Hero, Phase Shift or YARG with the VR drum kit. You will need one of the two things listed below.
1.) Your physical MIDI hardware. Send output MIDI notes from game to your hardware, which you can route anywhere you like.
2.) Virtual MIDI ports. When you have no physical hardware. (Most common setup)
Both these setups can communicate with Clone Hero or a DAW. (Digital Audio Workstations, Reaper etc.)
1.) Simple Setup (No MIDI Hardware)
You don't need expensive physical MIDI hardware to setup a working MIDI setup in Windows and the game. You can make a virtual MIDI port that will receive and process the MIDI notes from VRDUS, just as physical MIDI hardware can do, but all locally on your PC in a Windows environment.
Enable
Enable MIDI note output in the MIDI tab in-game under the main menu tab. MIDI 1.0 standards. Drums already set on channel 9/10.
Make A Virtual MIDI port
If you want to receive MIDI information from VRDUS and send them to programs like Reaper (DAW) and have no MIDI input port/device listed on your PC, you can set up a virtual MIDI port with just one click using free application loopMIDI. We will show you how to setup loopMIDI below.
loopMIDI Setup
Install loopMIDI. When the application starts there are no virtual MIDI ports. Click the "+" button at the lower left of the application to create a virtual MIDI port. The virtual port is now ready. You will see the "Total Data" increase with activity, like notes sent to it.
The virtual MIDI input device.
VirtualMIDISynth
Most computers now days come with no support for MIDI on the OS. Install VirtualMIDISynth. Once installed right click the VirtualMIDISynth icon in the Windows task bar and click Configuration.
Click the MIDI Mapper tab and set the Default MIDI out device. This we will set to loopMIDI Port, the virtual MIDI port we just created in the steps above. You can now close this application.
Reaper Setup
Install Reaper and run the program. When Reaper first starts up you will most likely receive an error message if your MIDI setup is not detected correctly. Click Options > Preferences. Then in the sidebar find and select MIDI Inputs and MIDI Outputs. Disable any unused MIDI device and right click the loopMIDI Port and "Enable". Repeat with the MIDI output selection, right click and enable loopMIDI port.

Reaper Track Setup
To record you'll need to set a track. Click the "+" button in Reaper to create one.

A track will be created, this is what a track looks like and will be added to the Reaper sidebar. Click the red "Record Arm" button. This track will now be ready to record when we are ready to start a recording, but first we must set what we will be recording, see the next step below.


In the track you just created you'll see "Input 1" click the dropdown arrow to expand the options. Set this however you like, but for a quick recording setup just select Input: MIDI > All MIDI Inputs. This track is ready to record MIDI inputs sent from VR Drums, we will come back to Reaper in a moment, see the next step below to enable MIDI in VR Drums.

Start VR Drums
Start VR Drums and in the menu select the MIDI tab. Take off your headset and look at your PC monitor, the MIDI debug and setup windows will display on the screen. You'll have a lot of settings here you won't need to worry about, we only need one, the Device to send MIDI option, see image below. This is where all your active MIDI devices are and which ones you can select, but for the quick Reaper setup we will select the loopMIDI Port we just set up in the priror steps above. Click the loopMIDI Port.
Back To Reaper
We are ready to make our first .mid drum file. Lets go back to Reaper and click the Record button. All notes now will be recorded that are hit in VR Drums. Hit the Stop button a couple buttons over to the right of the record button when you are done.

You will see the notes from the record now set on the track we created.
To export your recording as a .mid file, click File > Export project MIDI...

Advanced RAW .mid Note Highway
This is not the Clone Hero note highway but an advanced RAW .mid player and highway that will play your old and new .mid files in-game.
This note highway has 23 lanes of drum notes, it will read any of your .mid files and process them to the highway for you to play. The notes heard in-game are processed by a true software MIDI synthesizer built-in, processing and synthesizing each note as it plays, with all effects, not emulated wav files. The drum notes will be spawned onto the highway.

Modes
-
.mid play - Default. Play any of your old or new .mid files. They will be processed in-game and put on the note highway for you. In the main menu select the "2D Note Highway" that is labeled "2D Highway RAW .mid File." See image above. Use the browser that appears to select the .mid file at the location you placed it or have it located.
-
Play With Song.ogg - This option will sync an audio file "song.ogg" that is in the same song folder as the .mid file. To use this option check the "Play with song.ogg" in the .mid browser in-game. Find the song folder and select the .mid file in the games browser. The .mid file in this song folder can be named anything... greenDay.mid, offSpring.mid etc, select it to play. Since we have "Play with song.ogg" checked, when we select the .mid file, the "song.ogg" will also play and sync to the .mid notes to it. You won't need to hear the raw .mid notes being processed now with the song.ogg playing, so check the "Disable RAW .mid Synthesizer" in the games browser.
The game will also read some meta data you store in any .mid file, meta data can be entered into .mid files using DAW's like Reaper, author, song, year, bpm, comment etc.
.MID Notes Spawned (Available)
If your .mid files contain any of these percussion instruments, they will be spawned onto the note highway.
Ride2, Crossstick, Hi-hat pedal, Hi-hat closed, Hi-hat open, snare, all Low - High Toms, Ride 1, Cash 1, Crash 2, Splash, China, Cowbell, Tambourine, High drum, low drum (all misc. drums bongos etc.) and Kick drum.
Other instruments will be heard by the in-game synthesizer but not spawned onto the highway. Sax, guitar etc.
Play With Song.ogg Examples
You can chart any song and lay down drum notes using most DAW's (Digital Audio Workstations). A popular DAW is Reaper. You load the song.ogg into Reaper, then place the .mid notes for a drum track that can be played in-game. They will sync in-game. The .mid notes created with Reaper, include it in the song folder with your song.ogg. Make sure you place the notes on the standard drum channel(9/10) while creating your .mid chart. The game will play all instruments from a .mid file, but it will only lay down the needed notes, which are the drum notes(9/10).
The Advanced RAW .mid Highway is more for learning not arcade style gameplay, but hit and scoring will still be calculated, unlike the 2D Clone Hero Highway, there are no options for difficulty on the Advanced RAW .mid Highway. RAW MIDI .mid files don't have options for difficulty, nor need any reason for them as they are more based off an official "drum tab" or "drum score" of the actual song, rather than the "arcade" style limted 5 lane note placement used in Clone Hero.
Extra 2 High And Low Drum Notes?
These are the extra 2 notes located farthest right and the last 2 notes on the advanced highway. These notes will process and display any misc. drums like the high/low roto-toms, tube drums, concert toms, bongo's, would all be spawned as low drum / high drum.
Play With Song.ogg Folder Contents
-
greenDay.mid (The .mid can be named anything)
-
song.ogg (The actual audio played over the .mid notes)
-
album.png (Optional)
Highway Size
This dropdown can toggle the size of the viewable note highway at anytime.
Album Art
Cover images that can be displayed in-game are also included with this highway. If you want to add an album image just place "album.png" or "album.jpg" in the song folder along with the .mid file, and optional song.ogg if used.
Mute .mid Drums Only
Enable this to disable the MIDI synthesizer from processing the kick notes on the highway and in the .mid player.
Highway Speed & Note Spacing
This is needed if you find your notes layered over one another, to close to on another. Raise this setting to spread the notes farther apart on the highway, lower is to bring them closer together. If the notes are scrolling to fast, lower this setting. If the notes are scrolling to slow for you, raise this setting.
Mute .mid Synthesizer
Enable this to mute the entire .mid audio and all its notes. This is useful if you are using "Play with song.ogg". You won't need any of the .mid notes processed and heard if you included a song.ogg in your song folder. The audio from the song.ogg will be heard.
A note hit close to the hit-line. Standard points.
How many hits in a row. Will drop when you miss a hit. To reach a new streak, you will have to reach your past streak. The streak count will be displayed in-game.
Combo will work towards your streak. A combo starts once 5 or more notes are hit without a miss. It will continue to count add add bonus points each hit during a combo. When the combo reaches your last streak, it will save the combo as a "Streak". Also know as max combo depending the game.
20+ Combo - 2X scoring.
30+ Combo - 4X scoring.
40+ Combo - 6X scoring.
A hit on the hit-line with near perfect timing. Bonus points each perfect. Bass hit-line highlights green with a perfect bass hit.
How many notes you missed, that passed the hit-line without a strike on a drum to register it.
Each note hit adds score. A perfect hit, combo hits and max streak all add extra bonus points to the final score. Missing a hit will subtract some points. At the end of each song a final grade will be displayed. An A+ can only be reached if you miss no notes.
MIDI (Quest)
Testing
This feature is under active development but can be tested in-game v31.5+. Any reports speed up the process. Join Discord.
Test MIDI Device Hardware: YAMAHA --> Roland -->MOTU -->MCS -->korg -->CME --> Please report results.
Android phones have not been fully tested. Please report results.
If you are using a Bluetooth MIDI device you will need to enable Bluetooth in your headset along with granting VRDUS the required permissions found in the games permission settings on your Meta Horizon OS. Some test only worked with Bluetooth while others wired.
1.) Start the game.
2.) If using a USB-C connection. Connect your MIDI device into your headsets USB-C port. (Skip to step 4.)
3.) If your MIDI device is Bluetooth enabled, enter the main menu and click the enable MIDI tab. (BT scanning starts quietly in the background for BT enabled MIDI devices. If the device is not a MIDI device it will not be listed or detected and skipped by the OS/VRDUS. MIDI devices found won't be shown until you click the first gray device ID box. See step 5.)
4.) If you connected a MIDI device via USB-C, enter the games main menu tab and enable the MIDI checkbox, accept the prompt that appears in the Meta Quest headset to accept the USB connection.
5.) When you check enable MIDI you will see that there are 7 gray device ID boxes, each one can hold a MIDI device ID (MIDI device) to be selected anytime, once select that is the device enabled. The gray ID device boxes will be MIDI devices 1-7 you currently have connected (1 via USB or up to 7 via Bluetooth scanning). Click on the first "gray device box" to connect to device 1 and reveal that MIDI device ID, click on device box 2 to reveal MIDI device captured on device ID box 2 and so on.
6.) VRDUS will be sending MIDI notes out on most items in-game (Snare, Hi-hat, Ride, Crash cymbals, Splash cymbals and more) when hit at any velocity. MIDI notes Channel 10 standard MIDI instrument note #'s.
Troubleshoot
- Disable the auto start of Quest Link activation in developer mode on your headset (You can only access developer mode by registering your headset with the Meta Horizon mobile app. This is useful if you are using USB to PC and don't want Meta Quest link to take over the USB connection.
- In USB-C connection mode the headset will act as a MIDI host and will not detect a virtual MIDI port to a PC via USB (loopMIDI etc.) If you want to control a virtual MIDI port like loopMIDI you can with an advanced bridge setup. Example phone set on MIDI to PC, a MIDI input/output bridge on the PC controlling the Bluetooth input. (Reaper, MIDI-OX).
- Will recognize physical MIDI hardware devices connected via USB-C to the headset. USB-C to USB-C, USB-B to USB-C, USB MIDI convertors to USB-C.
- You can try to set the Meta Quest to "Peripheral mode" and force MTP to MIDI using ADB commands (see below) with Android Studio or SideQuest if you want to use another MIDI host like a PC and the headset as a peripheral MIDI device. This can be useful for detecting and listing the headset as a MIDI input port on phones, Bluetooth PC's etc. Although Bluetooth connection is an robust detection method for this use.) If not using Bluetooth, start SideQuest on your PC, connect your headset to the PC via a USB cable, in SideQuest click the "Run ADB commands" button in the upper right of the screen, it's a box with an arrow, and type the command.
adb shell setprop sys.usb.config midi
- The Bluetooth MIDI option has advantages on scanning for MIDI devices and can detect phones with MIDI. Devices scanned and registered will only be shown once you click gray device ID# boxes that appear when you enable MIDI in the VRUDS main menu tab, once they are select, the ID is revealed and that device is the active device used for the MIDI connection.
Contact us or join the Discord if you have a specific hardware VENDER ID you need added for testing. If your VENDOR ID is not listed in the current build (Test MIDI Device Hardware), listed above, your hardware will not work.
If you are still having issues. The PC version of VRDUS has a much simipiler robust MIDI setup.
If you only have a Meta Quest and a fast enough PC to run VRDUS you can run the PC version using Virtual Desktop with your Meta Quest PCVR games.
Performance FPS (Quest)
Tracking
The only issue you may have on the Meta Quest with performance and smooth gameplay is visual tracking. Make sure your area is well lit so that the Meta Quest tracking cameras on the headset can track your hands smoothly, a dark lit room will cause the Meta hand tracking to possibly miss track your hands and cause a flutter.
Base FPS (FPS 70+)
-
Disable locations.
-
Trash all lights.
-
Disable Shake (Unwanted physics calculations)
-
Lighting Menu > Disable GPU Processing (Unwanted CPU/GPU calculations)
-
Disable legs, drummer body and hands.
-
Record in SD and not HD. (Tablet in-game)
Make sure your camera sensors on your headset are clean.
Locations
Disable the locations. Main menu, then locations tab and check the "Disable Locations" checkbox. Drumming with a location enabled can take up to 30% more memory and processing resouces. It is recommended you disable locations to free memory.
To Many Items
Spawning to to many items, drums, and cymbals, can take up memory on the headset. Although you shouldn't have to worry to much about this, as we spawned over 60 items with no issues. Keep an eye on how smooth the game is running at all times with the FPS counter located in the main menu's main tab. Dropping FPS can cause the physics engine to bottleneck and skip a crucial hit.
"Miss a beat, you lose the rhythm. Nothin' falls into place." - Sammy Hagar
For absolute maximum framerate you can use tools like the Quest Games Optimizer. The developer made a profile for the game but we never tested it out yet, if you do let us know. https://www.quest-games-optimizer.com/
Streaming (Quest)
Enter the menu and the "Main" tab. Near the bottom of the menu select "Enable LCK Tablet Camera". Then on the tablet select the "Stream" tab. You will need to download free "LIV Hub" app on your Meta Quest to complete the streaming setup. See the video below for a quick tutorial.
Other Live Streaming Options on Meta Quest (See videos below)
Use Beam XR. https://beamxr.io/
Streaming Using Tablet (Included In-game)
Streaming Cast Quest to PC & OBS
Streaming Using BeamXR
Performance FPS (PC)
An up to date PC with a powerful graphics card is recommend for smooth gameplay. Having 60+ FPS at all time is a requirement if you want to drum smoothly. Head to the menus main tab to view an active FPS counter. We strongly recommend a solid 70+ FPS because dropping frames is something you don't want to be doing while drumming in VR, and will lead to failed physics calculations that are called in that frame, and you will most likely experience odd behavior, skip a beat etc. To prevent dropping frames and running the application as smooth as possible, see possible solutions below.
Base FPS (FPS 70+)
-
Disable locations.
-
Disable all lights.
-
Disable Shake (Unwanted physics calculations)
-
Lighting Menu > Disable GPU Processing (Unwanted CPU/GPU calculations)
-
Disable legs, drummer body and hands.
Disable Locations
Disable the locations. This is the quickest way to grab more FPS instantly. Main menu, location tab and check the "Disable Locations" checkbox. Drumming with a location enabled can take up to 10% to 30% more memory on your GPU depending the location. It is recommended you disable locations to free memory.
Close Background Applications
Close idle background applications on your PC that are using up extra unnecessary memory, CPU cycles, applications on your computer that are running in the background.
Tracking
Sensors are clean and aligned calibrated for best tracking on USB 3.0 connection for max data transfer.
SteamVR Adjustments
-
Render Resolution: Set to "Custom" and reduce to 100% or lower (e.g., 80-90%) to significantly boost performance.
-
Refresh Rate: Lower the Hz (e.g., from 120Hz to 90Hz or 72Hz) if your PC cannot maintain the higher frame rate.
-
Motion Smoothing: Turn this OFF to reduce latency and improve performance consistency, especially if it causes stuttering.
-
Per-Application Video Settings: Access these to lower resolution or fix frame rates specifically for demanding games.
-
Alternative (Oculus Users): Set the OpenXR Runtime to Oculus in the Meta Quest Link app to bypass SteamVR for better performance.
-
In-game Mirror: Turn off or minimize the PC monitor mirror of your VR game to save GPU resources.
-
Additional Tips:
-
Ensure your GPU drivers are updated.
-
Close unnecessary background applications to free up CPU/RAM.
Recording OBS high quality, high framerate video on top of running VR Drums Ult. and SteamVR all together requires a lot of resources and memory on your CPU/GPU/Memory, and go hand in hand with performance concerns while drumming, see the Recording Videos section below for help on recording videos.
Graphic Card Adjustments
Use tools like Nvidia Control Panel to lower multiple graphic settings on your video card to free up memory and gain more FPS. Lowering some of these settings can have a significant increase on performance.

Nvidia Control Panel.
Recording Videos (PC)
You can use any video recording software or method you like, we record our videos using OBS Studio. You can also stream to Twitch or any platform including YouTube with OBS Studio.
Best Recording Method
It is significantly better to record OBS video to a separate physical drive than the one running your operating system and game. Using separate drives prevents the drive from struggling with simultaneous heavy read/write tasks, reducing the risk of dropped frames, stuttering, and improved in-game FPS.
Key Considerations
-
Performance Bottleneck: Recording creates a continuous stream of data. If the game and the recording share the same drive, they compete for bandwidth, causing the drive to "jump" back and forth, which can slow down performance.
-
SSD vs. HDD: Ideally, use a fast SSD for both gaming and recording. If you only have one SSD, record to a separate HDD. If you have two SSDs (e.g., M.2 or SATA), that is the optimal setup.
-
Drive Type: Avoid recording to slow external USB drives, as they might not handle the high write speed, leading to choppy footage.
-
Exceptions: If you are using a very fast, modern NVMe SSD for both (e.g., a Gen4 drive) and are not recording in extremely high-bitrate, uncompressed, or 4K/60fps formats, you might not see a huge performance drop. However, keeping them separate is best practice for reliability.
Performance
Capturing videos can be demanding on your PC/CPU/GPU and will bottleneck physics calculations in-game if your drop below 60FPS. Tune your capture settings and computers performance. We can help with some various tips in the Performance section. We recommend a lower video bit-rate if you notice FPS drops while recording. Below is the video settings we found to be a good balance for recording while in VR, they may need to be lowered even more depending on how powerful your PC is. Play around with OBS and the "Output" and "Video" settings for best performance while capturing video. See below for what we use. Some PC setups may capture video better with different "Video Encoder" options, the "Hardware" option uses your GPU to capture video, while the "Software" options captures video using your CPU, see what one works best for your PC setup.
OBS Standard Settings
Settings we use to record standard videos in-game. Example video recorded with these settings.

OBS Output settings.

OBS Video settings.
OBS Slower PC Settings
OBS recording settings that we recommend for recording on slower PC's. Example video recorded with these settings.

OBS Output settings.

OBS Video settings.
Recording Videos (Meta Quest)
Use the included Meta screen capture tool included on all Meta Quest to record MP4 videos. Visit the "Main tab" in-game for other recording tools like the third person tablet camera that will use an external camera to film and save .MP4 video files to your galley.
Video demonstration on how to record videos on Meta Quest using the already installed Meta screen capture https://www.youtube.com/shorts/6tmLLwSBS5g
Extra Settings
Below are some extra options you can find in the menu and sub menu tabs.
Shake (Rack Shaking) > Drum Builder
Disable this option to disable the drum racks from taking hit resonance that cause the rack to shake. Disabling this option can increase FPS slightly.
Disable Force Feedback Battery Saver > Main Menu
Disable all rumble motors on controllers. This will increase usage time and prolong battery life on each controller.
Walking > Main Menu
Enable standard walking and movement style controls using the analog sticks. This feature has been reported to have some bugs, if you notice the rotation may stop working. This will cause a memory leak in game and cost FPS. If you notice a FPS drop while using this option, and the rotation on the right analog stick stops working, disable this feature.
Grab Sticks > Main Menu > Sticks
Enable this to unlock your sticks from your hands. You can then grab the sticks with whatever angle you desire with the grip buttons on your VR controllers. Hold the grips and get the sticks how you like and uncheck this option to lock your sticks into place.
Cycle Physics > Main Menu > Sticks
In vey rare situations you may lose the ability to hit anything with your drum sticks. If this happens clicking this button will cycle the physics and clear up this issue, allowing you to strike again.
Disable Hi-Hat Sustain > Main Menu > Extra Settings Button
This will mute any clashing of the cymbals and sustain coming off the hi-hat when the foot pedal is released.
Soft Reset > Main Menu > EDV Tab
This option is here if you run into a bug, or a soft lock. Press the "Soft Reset" button to quickly refresh the scenes settings and start from scratch. This option will skip the boot room and load you right into the game, saving you about a minute or two from restarting the game manually.
Edit Mode
Entering Edit Mode is how you can change and customize your setup. To enter Edit Mode, press in the left controllers analog stick, Edit Mode will enabled. When Edit Mode is enabled, there will be a blue gear that will appear on each drum/cymbal. Place your left hand over the blue edit gear, the drums Edit Menu will appear. When you're done with Edit Mode, press the controllers left analog stick in again to exit Edit Mode.
Recording Demos for Replay (Temp Removed)
The demo recorder is under development, but works pretty well at its current state. Record a replay of yourself drumming. These are called demos. A demo replay is stored into a single file drumDemo.replay that you can share with other players or backup for yourself. Follow the instructions below to record a demo.
Your demo folder should contain 2 files. The replay file and the music.ogg you played while drumming. For PC if you did not included a music track just included the drumDemo.replay file. On the Meta Quest include the music.ogg even if you have no music, make the file blank or an audio description or introduction to your demo. Music or an audio file you use must be renamed to "music.ogg".
Each demo should be in its own directory, with the 2 files below.

drumDemo.replay - The replay file.
music.ogg - Music/Speech included.
Replay Save Location
Meta Quest android/data/com.aliencybercoat.vrdus/files
PC C:\Users\Username\AppData\LocalLow\Alien Cyber Coat\Files
To play a replay file, enter the Main Menu and head to the DV Tab. Check the "Demo Recorder" checkbox. The browser that pops up is the demo browser, find your demo files and select them to play. See the image above on what should be in each demo folder.
The kit the replay was recorded on must be selected and loaded in-game before playing the demo. You should include a text file in your zip of your demo that list what kit you used to record the demo with.
A example demo is included on both versions and was recorded on the default kit.
Skipping Hits and Missed Hits (FPS)
Head to the main menu tab and take a look at the FPS counter right of the volume controls. We recommend 70+ FPS for smooth drumming. It is very possible for the game to miss a hit or misbehave, only if you drop below a steady 60 FPS and are having performance frame-rate hiccups. Below are some things that could cause the game to drop FPS. Dropping FPS calculations will drop crucial physics calls that are performed in that frame, which could of been a hit. This is usually a PC problem more than a Quest issue. See below for solutions and causes.
Base FPS (FPS 70+)
-
Disable locations.
-
Disable all lights.
-
Trash all spawned lights.
-
Disable Shake (Unwanted physics calculations)
-
Lighting Menu > Disable GPU Processing (Unwanted CPU/GPU calculations)
-
Disable legs, drummer body and hands.
Tracking / Lighting
On PC ensure sensors are clean and aligned calibrated for best tracking on USB 3.0 connection for max data transfer.
On Meta Quest make sure the tracking cameras on the headset are clean and your room is well lit, a dark lit room can cause the Meta tracking cameras to flutter or incorrectly track your hands.
Frame rate
- PC is not fast enough.
- Close all background applications running that use unwanted memory.
- Programs like OBS with to high bit-rate and high quality settings for recording options demanding a large 30% CPU or more. Try lowing the frames captured or the video recording resolution and bit-rate to around 1600 or lower.
- Tweak and lower your GPU's quality settings for more FPS with Nvidia Control Panel or similar GPU tools.
- In-game overlays such as Steams mounted desktops, calling for nearly double the memory used while playing.
- To much in-game items, to much lighting effects spawned or enabled.
- The in-game video player can lag the game depending how large (how many frames and quality) the video is or speed of your PC. may be to much demand on the PC and may hiccup FPS. Try using the audio player which requires a lot less memory.
- Disable locations in the "DV" tab, to free texture and model memory from your GPU and increase FPS.
Aiming
If all these things above are fine, and you are 70 FPS+ and still missing hits, it might not be the game, I've done this myself, keep a close eye on the range of the tip of the stick and really try to aim each hit right where it needs to be, it's easy to miss an edge just slightly but think you hit it, the sticks with the red LED tips can help with this practice with aiming and striking. Use the "Manual Size" option to size up the hi-hat or other items that might be to small, that are causing you to miss a hit. Visit the "Sticks" tab and select the "Grab Sticks" option, grab or re-align your sticks how you feel comfortable holding them, and then uncheck the "Grab Sticks" options. These settings will save with any kit. These are just some tips that helped me over the years.
Note: A good sign of dropped frames is... you hit the snare at max strength, but it registers the hit like you hit it softly or just barely, like you can't seem to hit it hard enough. This is a usually sign that FPS are not fully stable and probably need to be increased for smoother gameplay. You will also start to see the cymbals slow down, while the physics simulation bottlenecks in lost/dropped frames and the CPU is trying to catch up.
Tools:
Quest Optimizer (Not required, but can boost frame-rate of all your Meta apps)
The dev of this optimizer made a profile just for VR Drums Ult. but we have not tested it out ourselves.
Nvidia Control Panel for PC or similar GPU tools.
Item Customization Options
We tried to list them all but there is some customization options we missed, if you have a question on anything join the Discord.


Tuning
(Located in Edit Mode) On: Most items.
This adjustment will change the size of the item and affect the overall sound. Tune up for higher tuning and down for lower tuning. If the auto sizing on the tuning wasn't correct and you want to fine tune an items size after tuning use the "Manual Size" option. SEe below.
Manual Size
(Located in Edit Mode) On: Most items.
Trouble hitting something? To small for aim? Change the size of the item without effected the tone. We use this mostly on the hi-hat.
Add Damper
(Located in Edit Mode) On: Most items.
Will lower the volume of the item. Raise the damper to lower the volume. Lower the damper to raise the volume.
Cross Stick
(Located in Edit Mode) On: Snare 1 and 2.
Enable cross sticking on the snare drums. Lay tour left hand near the snare drum, and tap the drum stick onto the rim. You won't have to flip the stick. Example video of cross sticking.
Drum Pad Mod
(Located in Edit Mode) On: Snare 1 and 2 and other drums.
This setting is enabled by default and involves use of the graphical drum pad decals that lay over a drum head. Having this option enabled will apply a drum decal over the drum head when "Drum Pads' are selected in "Drum Builder".
While this setting is enabled, selecting different drum pads will change the drum pad decal of the selected drum.
if the "Drum Pad Mod" option is disabled, the drum will be excluded from "Drum pads" in the "Drum Builder". If you already applied a pad to the drum, and then disable "Drum Pad Mod", selecting different drum pads will not apply to this drum.
You can apply multiple different decal arts to different drums using this option.
Metal Color
(Located in Edit Mode) On: Snare 1 and 2, all toms and most drums.
While "Metal Color" is enabled, the metal hardware of that item will change when you select a metal color in the "Drum Builder". If "Metal Color" is unselected the drum will be excluded from any new color metals selected in "Drum Builder" and the paint will be set.
Tension
(Located in Edit Mode) On: Most items.
Every drummer plays a little different when it comes to their cymbal tension setting. This is basically how much you want your cymbal to move around when you hit them. You can adjust most all of the cymbal tensions in "Edit Mode". Press the left controllers analog stick in to enter edit mode, then place your left hand over a crash cymbals mod gear, the instruments "Mod Menu" will appear, lower and raise the desired tension. The higher the tension, the less movement that cymbal will have. All tension settings will save and load with your kit and have tension display values.
Rack Stand
(Located in Edit Mode) On: Most items with a default rack attached.
Disable this option to remove the default rack stand part included with the item. Useful if you want to use your own racks.
Flip
(Located in Edit Mode) On: Ice Bell and Z Bell.
Enable this option will remove the rack stand from the item and flip the bell so it can be mounted on top of anything you wish. These inverted bells are usually placed on top of a crash cymbal.
Remote
(Located in Edit Mode) On: Spare Hi-hat.
Enabling this option will allow open and close control of the spare hi-hat via the left controller primary button.
Open/Close
(Located in Edit Mode) On: Spare Hi-hat.
The spare hi-hat spawns clamped at default. Enable or disable this option to set the default position of the hi-hat.
Speed Snare
(Located in Edit Mode) On: Snare 1 and 2.
The default physics on the snares are cleaner but do have less response with really fast snare rolls. Most players won't need this option on and we recommend it off. If the snare is not sensitive enough at default, enable this option. This is a recommended mod by Jeremy. This setting saves/loads with kits.
Ride Crash
(Located in Edit Mode) On: Ride Cymbal.
Enable to crash the ride. You'll really need to give it some strength. This setting is enabled by default. There are 2 settings for strength, low (default) easy hit and high, for max swing strength. You can disable the ride from crashing all together in the ride cymbals Mod Menu "Ride Crash" checkbox. These settings save / load. This is more of an expert setting, with "Ride Crash" enabled you have be more aware of the strength your hitting the ride every hit.
Required Strength
(Located in Edit Mode) On: Snare 1 and 2.
Lower this setting to require less striking strength for a max hit on the drum head.
Hit Strength
(Located in Menu) On: Sticks tab.
Raise this setting to alter the physics engine and apply more power to cymbal strikes in return making them swing more. This setting saves/loads with kits.
Custom Art Packs (Image Templates)

Created by DrHotWing
Custom art packs are a set of images that are stored in a single directory/folder that can be loaded all at once as a "custom art pack" which contains various custom skins that can be applied to any custom drum kit. These packs are artistic in nature and can be anything that you design using the included image templates and your favorite image editor. Download a zip of the custom pack image templates in the Links/Tools section. Above is an example of Neil Peart's Time Machine drum kit, complete with a custom art pack.
Custom Art Browser
Main Menu > Drum Builder > "Custom Art Packs" checkbox. This will bring up the Custom Art Pack browser. Find the folder that contains all the custom art and select it. The art will be applied to any custom drum kit.
Does the save files pack in the graphic art files?
No... You must select the pack in the browser in-game, saving the kit will re-apply it automatically if you saved it after you applied an art pack.
Loading
Head to the the "Drum Builder" tab and select the "Custom Pack" button. This will bring up the custom pack browser, find your custom pack folder on your PC that contains the images you are using, and select it. The contents that the creator added to the directory will be loaded to your drum kit.
Creating
You do not need to own the base game to create or view custom art packs. You can use the image templates and drag and drop them into you favorite image editor. You can also use the free standalone application the VRDUS Mod Viewer to view any custom art pack with just 1 click.
Hide Drum Head
Some drum pads use (.PNG) transparency options with a cutout design and need to see the drum head/color under the drum pad decal for full effect. While other creators do not. This option will remove the original drum head, this setting will save with the kit. This option can be useful if you are creating a transparent drum head, and do not need to see the drum head under it.
Opacity/Transparency
Most the image templates are .PNG format with an alpha/transparent layer. Feel feel to use multiple layers in the image as well as alpha cutouts, opacity, and transparency. Area's of the image left blank will be invisible when applied in-game. This can allow for all sorts of cool design options.
Image Resolutions
Feel free to size the dimension (resolution) of the template images higher or lower, to your liking. The size of the final images won't matter.
-
High Resolution
Better quality images but less performance on slower PC's. A full art pack at default resolution can take up to 35mb in memory. If you are on a slower PC, you might want to lower the image quality of the custom pack image templates.
-
Low Resolution
Lesser image quality, but faster performance. Less demand on slower PC's.
Example: Below are all the images included in a full custom art pack. Download the latest templates in Links/Tools.

Standalone VR Drums Ult. Mod Viewer (PC Optional)
Standalone application that you can use on PC to quickly view stick creations, or whole custom art packs. It can be downloaded from in the Links/Tool section. You do not need to own the base game to run the Mod Viewer and create art packs for yourself or others. Image templates are included.
When you load a pack in the Mod Viewer, the contents that pack includes will be shown at the bottom of the application. Green for the image is included, and red for missing images. (Note: You don't need to included all images, in any pack.)
Link/Tools for downloads.

Using LIV (PC)
This is the same method used by various Beat Saber content creators. It allows for a wide range of custom VR avatars or adding yourself into any VR game that supports it, included VR Drums Ultimate Streamer.
Download LIV on Steam, it's free! First let's launch VR Drums Ultimate Streamer in Steam. Now launch LIV from Steam, when LIV starts up select "Guest". Then "Virtual Cameras & Avatars".

Select VRDUS.exe as the "Target".


Setup LIV now in-game by looking at the floor, you will see a green LIV logo, select it and use the LIV menu that appears to select your avatar and external camera. In LIV menu select "Camera" and then Selfie Cam, or whichever camera option you like for your scene. You can grab the LIV selfie camera and place it where you wish. Select "Avatars" in the LIV menu, LIV comes with some avatars included that you can use right away, if you would like to have more avatars search for any (.avatar) custom avatars online, or find them on community pages like https://modelsaber.com/Avatars/
Adding Custom Avatars
Drag and drop your (.avatar) file over the LIV application window in the screenshot you see above.

LIV custom avatars in VR Drums Ult.
Create Drum Charts for the 3D Note Highway
Update: The CH note highway will now play any custom Clone Hero song folder.
VR Drums Ultimate Streamer 3D highway can read files more commonly known as "Clone Hero drum charts". You can also create your own drum charts to any song, that you or others can play in-game.
Below are a couple of chart editors that can be used to chart a drum chart to any song you wish, even your own. You can Google some tutorials on how to use them. These styles of charts are more popularity know as "Clone Hero" drum charts. The game will convert your .chart for you and make a backup notes.mid.
Moonscaper Chart Editor
Free Chart Editor (VRDUS compatible). Popular and widely used chart editor you can map your own drum chart to any song with. This is the application used to chart the included songs in-game. It syncs pretty well with VRDUS.
FeedBack Chart Editor
Free Chart Editor (VRDUS compatible). Lesser known chart editor but easy to use and syncs well with VRDUS.
We have a short guide on how to chart for the for the FeedBack Chart Editor in the old alpha help guide on the ACC GitHib page, but we recommend using Moonscraper. See the Add Custom Songs & Play Them section on how to load these custom drum charts in-game and play them.

Moonscraper. (See Links/Tools)

Played in VRDUS.
Load Other Players Custom Kits (PC)
You can load other players kits by just dropping their single save file "CustomKitData.bin" into one of your save slot directories.
Note: PC and Meta Quest save files differ from one another. PCVR can only load PC save files and Quest can only load Quest save files.
When you save your drum kit to a save slot in-game, the entire kit and its custom settings are stored in a single file "CustomKitData.bin". Save kit files are usually under 1Mb in size and are easy to transfer around being a single small file, they contain no personal information about you or your computer, they simply contain the information of your drum kit setups, customization options and scene settings.
All your save files can be found on your PC at Users\Username\AppData\LocalLow\Alien Cyber Coat\Files

You can power off the game your save files are saved to your computer and will be available to select them each time you play. You can backup this files if you wish or share them.
These slot directories are also where you place the custom drum kit file "CustomKitData.bin" you want to load, if you downloaded one from the forum, or someone share the file with you. Plcae the "CustomKitData.bin" file in any of the directory slots numbers.
If you didn't save a kit yet, these folders won't be there and you will need to make them yourself, or just save a kit in-game and the game will create that folder slot for you. If you placed the kit file in Slot_1 directory folder, return to the game and click the "Load" disk button from Slot 1 within the game, if you placed the kit file in Slot_2 directory, click the "Load" disk button from Slot_2 in-game etc.
When you save a drum kit in-game to a save slot "Slot 0" it will save the file in a subdirectory labeled that. Slot 1 will be Slot_1 etc.
3D Note Highway Clone Hero Music
Update: This video is outdated and has some misleading information. You can now add both .mid and .chart song folders. They both are now supported.
Warning the 3D note highway will exit the regular drum simulator. The 3D note highway will play any Clone Hero song folder and is now updated to sync to any song length unlike previous versions that struggled with it in the past, this issue has been cleared up in v32.5+. Play single or multitrack songs. Select the song folder in-game and then select song.ogg. The drum audio track will be removed for you if using a multi-track song (song.ogg, vocals.ogg, etc.) and you will be the only drummer heard.
Where are the songs?
You must add your own "Clone Hero" drum charts (.mid or .chart format). See "Add Custom Songs" section. There thousands of charters who chart for Clone Hero drums. The song must include a drum track.
Song will not play?
Head to the menu and click the "DV" tab. Click soft reset, this will quickly reset the game if a chart file errors out reading.
notes.mid or notes.chart, album.jpg or album.png, (the audio files) song.ogg .mp3 .wav can be any of these formats. These 3 files must be in a song folder. Check your song folders. They are commonly song.ogg, vocals.ogg, guitar.ogg etc. You can leave folders how you get them. Also song.ini.
GameplayYou will see stance position footprints on the floor, place yourself near them standing or in your chair, it won't matter we play both ways. Press the analog sticks in to raise and lower your player. You align yourself to where you feel comfortable, each player plays slightly different here, arm lengths, etc. Hit the notes as soon as they pass over the hit-line on the floor in front of you. See more below.
Chart Conversion
The game will create and convert any of your notes.chart files into notes.mid when you select then in-game for scoring features. The newly created notes.mid will be placed into the song folder and will be converted using the notes.chart file. The original notes.chart file will remain in the folder as well.
Features
A note hit close to the hit-line. Standard points.
How many hits in a row. Will drop when you miss a hit. To reach a new streak, you will have to reach your past streak. The streak count will be displayed in-game.
Combo will work towards your streak. A combo starts once 5 or more notes are hit without a miss. It will continue to count add add bonus points each hit during a combo. When the combo reaches your last streak, it will save the combo as a "Streak". Also know as max combo depending the game.
100+ Combo - 2X scoring.
200+ Combo - 4X scoring.
300+ Combo - 6X scoring.
A hit on the hit-line with near perfect timing. Bonus points each perfect. A perfect bass hit will highlight the hit-line area green. Regular hits will display a "Perfect" inside the lane.
How many hits you missed over the hit-line.
+1,000 extra bonus points added each cross-hit. A cross-hit counter is added to the scoreboard as well. What is a cross-hit? Hit any drum with the opposing drumstick on the 3D highway, you will see +1,000 bonus spawn, and added to the scoreboard. Example, the crash note on the 3D highway is located far right and is normally hit with the right hand, a cross-hit would be doing something most players don't do, which would be crossing your left hand over to hit the crash note, this is a cross-hit. These are style points, they look cool in-game and are a little harder to pull off, you choose when a cross-hit is good for you, it's a good way to out score another player by using as much cross-hits as you can, even if the other player perfects every note, you can get a higher score with using more cross-hits.
+1000 points will appear when you cross-hit.

Select Easy-Expert. Each setting with spawn the selected difficulties note pattern. Most charters only chart for expert, but not always, medium is a great level for everyone usually, cycle option in-between sets and try them all. Expert charts usually contain a lot more notes and it's recommended to raise the "Highway Speed & Note Spacing" to keep them spaced apart and easier to play, see below.
This is needed if you find your notes layered over one another, to close to on another. Raise this setting to spread the notes farther apart on the highway, lower is to bring them closer together. If the notes are scrolling to fast, lower this setting. If the notes are scrolling to slow for you, raise this setting.
This dropdown can toggle the size of the viewable note highway at anytime.
Each note hit adds score. A perfect hit, combo hits and max streak all add extra bonus points to the final score. Missing a hit will subtract some points. At the end of each song a final grade will be displayed. An A+ can only be reached if you miss 0 notes.
The accuracy graph will appear at the completion of each song. The graph will display your perfect hits, near hits, and misses. There will also be a total percentage accuracy calculated. See below for detailed information.
A - You will need 90% or better accuracy with less than 16 notes missed.
B - At least 70% accuracy.
C - 50% accuracy.
D - Low accuracy. Raise the speed / note spacing, or lower the difficulty if the charter included extra difficulties with the song.
-
Star Ratings
✮ Gold Star -- 1 Stars (Fair)
✮ Gold Star -- 2 Stars (Good)
✮ Emerald Star -- 3 Stars (Great)
✮ Osmium Star -- 4 Stars (90% accuracy or better)
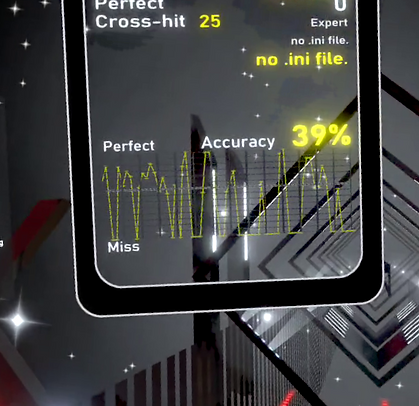
Accuracy
This accuracy graph will calculate at the end of each song. The graph displays the songs length from beginning to end with your progress along the way. These points will appear relative to how close to hit each note to the hit line (on time).
A point at it's highest is a perfect hit, any point near the middle is a near perfect hit but a little off timing. A point all the way at the bottom of the graph is a missed it.
Accuracy Percentage
Along with the detailed stats shown on the graph is a overall average accuracy you performed while playing the song. This percentage value will automatically save upon completion of a song and restore each time you play. Each time you complete the song the percentage average will be updated.
If you wish to share your scoring, take a screenshot of the scoreboard which displays all the information, including the charter who charter the song. This can be used to compare scores and clarify what chart you are actually playing.

Each time you complete a song, the Clone Hero song browsers will be updated with your new statistics and accuracy values. This will save automatically upon song completion, and load back up every time you play.
Image to the left.
Red Number (30) (Notes Missed)
White Number (207) (The Songs Total Notes)
Yellow Number (39%) (Your last accuracy score)
Star Ratings
✮ Gold Star -- 1 Stars (Fair)
✮ Gold Star -- 2 Stars (Good)
✮ Emerald Star -- 3 Stars (Great)
✮ Osmium Star -- 4 Stars (90% accuracy or better)
These settings will be overwritten every time you complete the song. The values do not differ whether or not you're playing on the 2D or 3D highway.
Backup My Scores
All the scoring information is store in a preference file. Because the Quest runs on Android, these system files are located in the device's protected root directory and cannot be accessed without rooting the headset. Back up this file can be a process, but if you really must save this file join the Discord for information on how.
2D Note Highway Clone Hero Music
The 2D note highway will play any custom Clone Hero song folder, that have drum charts included. Enter the main menu, and then click the "2D Note Highway" button, you'll see a Clone Hero logo over the highways that support Clone Hero songs. Use the browser that appears to find and select your Clone Hero song folder that you want to play, then click the "song.ogg" to start. Sometimes the audio files can be named differently depending who made them, sometimes it can be "music.ogg"... etc. Single-track and multi-track songs are supported. The drum audio track will automatically be removed the original song if you are playing song folders with multi-tracks.
Gameplay
Hit the notes when they pass over the hit-line.
Where are the songs?
You must add your own "Clone Hero" drum charts (.mid or .chart format). See "Add Custom Songs" section.
Features
A note hit close to the hit-line. Standard points.
How many hits in a row. Will drop when you miss a hit. To reach a new streak, you will have to reach your past streak. The streak count will be displayed in-game.
Combo will work towards your streak. A combo starts once 5 or more notes are hit without a miss. It will continue to count add add bonus points each hit during a combo. When the combo reaches your last streak, it will save the combo as a "Streak". Also know as max combo depending the game.
100+ Combo - 2X scoring.
200+ Combo - 4X scoring.
300+ Combo - 6X scoring.
A hit on the hit-line with near perfect timing. Bonus points each perfect. A perfect bass hit will highlight the hit-line area green. Regular hits will display a "Perfect" inside the lane.
How many hits you missed over the hit-line.
A - You will need 90% or better accuracy with less than 16 notes missed.
B - At least 70% accuracy.
C - 50% accuracy.
D - Low accuracy. Raise the speed / note spacing, or lower the difficulty if the charter included extra difficulties with the song.
-
Star Ratings
✮ Gold Star -- 1 Stars (Fair)
✮ Gold Star -- 2 Stars (Good)
✮ Emerald Star -- 3 Stars (Great)
✮ Osmium Star -- 4 Stars (90% accuracy or better)
Select Easy-Expert. Each setting with spawn the selected difficulties note pattern. Most charters only chart for expert, but not always, medium is a great level for everyone usually, cycle option in-between sets and try them all. Expert charts usually contain a lot more notes and it's recommended to raise the "Highway Speed & Note Spacing" to keep them spaced apart and easier to play, see below.
This is needed if you find your notes layered over one another, to close to on another. Raise this setting to spread the notes farther apart on the highway, lower is to bring them closer together. If the notes are scrolling to fast, lower this setting. If the notes are scrolling to slow for you, raise this setting.
This dropdown can toggle the size of the viewable note highway at anytime.
Enable this to swap the hi-hat lane with the snare lane, this is a useful play style for some users.
Each note hit adds score. A perfect hit, combo hits and max streak all add extra bonus points to the final score. Missing a hit will subtract some points. At the end of each song a final grade will be displayed. An A+ can only be reached if you miss 0 notes.
The accuracy graph will appear at the completion of each song. The graph will display your perfect hits, near hits, and misses. There will also be a total percentage accuracy calculated. See below for detailed information.
Accuracy Graph
This accuracy graph will calculate at the end of each song. The graph displays the songs length from beginning to end with your progress along the way. These points will appear relative to how close to hit each note to the hit line (on time).
A point at it's highest is a perfect hit, any point near the middle is a near perfect hit but a little off timing. A point all the way at the bottom of the graph is a missed it.
Accuracy Percentage
Along with the detailed stats shown on the graph is a overall average accuracy you performed while playing the song. This percentage value will automatically save upon completion of a song and restore each time you play. Each time you complete the song the percentage average will be updated.
If you wish to share your scoring, take a screenshot of the scoreboard which displays all the information, including the charter who charter the song. This can be used to compare scores and clarify what chart you are actually playing.
Each time you complete a song, the Clone Hero song browsers will be updated with your new statistics and accuracy values. This will save automatically upon song completion, and load back up every time you play.
Red Number (30) (Notes Missed)
White Number (207) (The Songs Total Notes)
Yellow Number (39%) (The Average Accuracy)
Star Ratings
✮ Gold Star -- 1 Stars (Fair)
✮ Gold Star -- 2 Stars (Good)
✮ Emerald Star -- 3 Stars (Great)
✮ Osmium Star -- 4 Stars (Perfect!!!)
These settings will be overwritten every time you complete the song. The values do not differ whether or not you're playing on the 2D or 3D highway.
Backup My Scoring Information
All the scoring information is store in a preference file. Because the Quest runs on Android, these system files are located in the device's protected root directory and cannot be accessed without rooting the headset. Back up this file can be a process, but if you really must save this file join the Discord for information on how.
Add Custom Clone Hero Songs
Quest (No PC option. Scroll down for with a PC option.)
1. Get your Clone Hero song, usually from your web browser. (Most songs are always a .zip file.)
2. Unzip the .zip file you got onto your Quest anywhere you can using free tool AnExplorer VR File Manager.
3. Then copy all the song folders to your Quest storage location android/data/com.aliencybercoat.vrdus/files/songs
4. Load the game, enter the main menu, select one of the note highways with the Clone Hero logo on it.
5. Select the song you just added in the browser in-game.
6. Select a music file.
PC
1. Load game and enter the main menu, then select one of the note highways with the Clone Hero on it.
2. Find your songs in the browser that appears to your left. Use the "Directory Up" button at the top of the song browsers to search all your file folders and computer.
Update: This video is outdated and has some misleading information. You can now add both .mid and .chart song folders. They both are now supported.
Meta Quest [Place your songs here on your headset] android/data/com.aliencybercoat.vrdus/files/songs
Single-track song folder example. Greenbay - Halo

Multitrack song folder example. Drums will not be played, you will hear the drum sounds as you hit notes. You are the drummer now.

"Song Folder" commonly used term in rhythm gaming. Each song will have to be in its own folder. These are "song folders". The 2 images above show what can be in each one.

PC: Where do I put my custom song folders on PCVR?
They can be located anywhere on your PC, use the Note Highway browser that appears in the game and select them. See the "***Required Files Detail" below.
Meta Quest: Where do I put my custom song folders on Quest?
android/data/com.aliencybercoat.vrdus/files/songs (See *Quest Note below)
*Quest Note
You won't be able to directly unzip a zip file into android/data/com.aliencybercoat.vrdus/files/songs. Meta will block this action thinking you are tempering with the games files and block the file from being extracted. An easy work around to this is to just unzip the file anywhere on your Quest that you can, any folder, and then copy and paste the song folder you extracted too android/data/com.aliencybercoat.vrdus/files/songs.
The file browser in VRDUS will manually load up this location (android/data/com.aliencybercoat.vrdus/files) in-game when you select the note highway modes. This can be another reason to place them in that location.
Transfer Songs to Quest With PC Option
Unzip the song folders on your PC and then connect your Meta Quest via USB and transfer folders from your PC to your headset using Windows file browser or the free app SideQuestVR. Some Windows platforms will recognize the headset as "Quest" and you can browse the files in "My Computer", where all your other PC drives are listed. If you have no access to a PC to transfer files, see below. You can download drum charts inside your Quest browser and then unzip them to the correct location on your Quest listed above.
No PC Option: Unzip files on Meta Quest
Download your drum charts in your Quest browser and then unzip the zip file using one of the apps below.

Download AnExplorer VR File Manager. - Use it to unzip custom song folders zips.
Other apps you can use to unzip song folders you download on your Quest but will need to be sideloaded. CX File Explorer or Amaze File Manager.
*Note
You won't be able to directly unzip a zip file into android/data/com.aliencybercoat.vrdus/files/songs. Meta will block this action thinking you are tempering with the games files and deny the file from being extracted. An easy work around for this is to just unzip the file anywhere on your Quest you can, and then copy and paste the song folder you extracted too android/data/com.aliencybercoat.vrdus/files/songs.
What is a "Song Folder?"
Song folders is the term used in most all rhythm games including Clone Hero, it's just a single folder, they contain all the files needed to play that custom song. They follow a standard format, below are the 3 required files you need in your song folder to play.
***Required Files Detail
Inside Song Folder Green Day - Basket Case
album.png (Can also be album.jpg)
notes.mid or notes.chart (Must be named notes)
song.mp3 (Song name and extension don't matter .ogg and .wav audio is also supported -- music.mp3)
song.ini
If you see no notes make sure you select "Expert" difficulty in-game, most charters only chart for the expert track and they will leave the others difficulties blank. If you still have issues playing the chart file, see bug details the chart file might have itself, for possible fixes.
Extra [Song.ini] Not required
The song.ini file is optional, it's recommended you leave it be. Some charters will leave a song.ini file in the song folder, what does it do? It stores song information like title, artist, and who charted the notes for the song etc. You can add these files yourself if the charter did not include one. This is the information that displays on the scoreboard, while some charters might of embedded the information inside the .chart or .mid file itself, both will display on the scoreboard.

Select one and the note highway file browser will appear to your left, this is the browser you will use to find your song folders that you saved, or downloaded to your device.
If you are on PC click the "GO Directory Up" button to search your PC's file system and locate where you have saved your song folders.
If using a Meta Quest, the file browser in-game will load up your song folder files located in on your Quest at android/data/com.aliencybercoat.vrdus/files/songs. Select the song folder to open it and show its contents in the browser, then select the audio file from within the song folder... it will be something like "song.mp3 or music.ogg". You are ready to play that song. You will hear "READY" and there is a 3 second prep time.
Note: If you run into an issues with a chart loading, you can head to the DV tab and click soft reset to quickly reset the game.

If you are on PC click the "GO Directory Up" button to search your PC's file system and locate where you have saved your song folders.
When you select the note highway button using your Meta Quest, the file browser in-game will load up your song folder files located in the located on your Quest at android/data/com.aliencybercoat.vrdus/files/songs.
Note: If you run into an issues with a chart loading, you can head to the DV tab and click soft reset to quickly reset the game.

Highway Gameplay
The guides are the neon color rings on a drum or a cymbal when you switch to any of the 2D highway modes. This can help if you are having trouble with what note on the highway coordinates to what drum you should hit. This effect can be enabled or disabled, find the options in main menu then the "Drum Builder" tab. Cycle it if you add new drums and want the guides on them as well.
A note hit close to the hit-line. Standard points.
How many hits in a row. Will drop when you miss a hit. To reach a new streak, you will have to reach your past streak. The streak count will be displayed in-game.
Combo will work towards your streak. A combo starts once 5 notes are hit without a miss. It will continue to count add add bonus points each hit during a combo. When the combo reaches your last streak, it will save the combo as a "Streak". Also know as max combo depending the game.
20+ Combo - 2X scoring.
30+ Combo - 4X scoring.
40+ Combo - 6X scoring.
A hit on the hit-line with near perfect timing. Bonus points each perfect. Bass hit-line will highlight green when a perfect bass is hit.
How many hits you missed, that went over the hit-line.
Select Easy-Expert. Each setting with spawn the selected difficulties note pattern. Most charters only chart for expert, but not always. Expert usually adds more notes which can be bunched together, you can space them out with the "Highway Speed & Note Spacing" option, see below.
This is needed if you find your notes layered over one another, to close to on another. Raise this setting to spread the notes farther apart on the highway, lower is to bring them closer together. If the notes are scrolling to fast, lower this setting. If the notes are scrolling to slow for you, raise this setting.
Each note hit adds score. A perfect hit, combo hits and max streak all add extra bonus points to the final score. Missing a hit will subtract some points. At the end of each song a final grade will be displayed. An A+ can only be reached if you miss no notes.
My Clone Hero Song Won't Play
You won't have to mod anything in your song folders, they will play as is for folders that include notes.mid.
1.) Make sure the notes even exist, use Moonscraper and load the chart to see if it has notes.
2.) Most importantly follow the naming format in the information listed below. Each song folder only requires 3 files to operate.
***Required Files Detail
album.png (Can also be album.jpg)
notes.mid (or notes.chart)
song.mp3 (Song name and extension don't matter .ogg and .wav audio is also supported)
Pedal Controls & Physical Hardware Foot Pedal
You can use the VR controller buttons for hi-hat and kick. This is enabled by default see below.
Right controller, button 2 kick, button 1 hit-hat.
Left controller, button 1 double kick. (If enabled. Main tab, Extra Settings.)
The secondary "Spare Hi-hat" can be controlled open/closed by enabling the hi-hats "remote" option in edit mode. This option is currently only on a VR controller button to operate, but can be mapped to any key/button if you are on PC using Steams remapper.
Other VR controller button options for kick pedals can be found in the "Main Tab" and then "Extra Settings" button, like setting the kick pedals to the controllers triggers buttons instead of the buttons on top the controller. See below for more "external" pedal options.
PC Hardware Pedal
Any device recognized by Windows with buttons can work as a kick or hi-hat pedal.
Device button 1 kick, button 2 hi-hat. (Remap any keys see below)
Meta Quest Hardware Pedals
We recommend a wired device to the USB-C connection on the left side of your headset for best latency using a pedal or device. You can use a Bluetooth device with no wires, but latency might be higher due to Bluetooth's limitations with transferring data, we don't recommend this method, but let us know. If you Meta Quest recognizes your connected USB-C wired device as a gamepad it will work in-game. Gamepad device button 1 kick, button 2 hi-hat.
VR Drums Ult. is made to automatically detect your USB connected controllers in-game, but if you have a unique controller that might not be working use Steams Remap already included in Steam and tested working with various hardware pedals and configs with VRDUS. https://www.youtube.com/watch?v=IDWwVmjqklw


PC Keyboard (K, Space)
Below is just some of the various device hardware you can connect to PC or a Meta Quest and use as a bass or hi-hat pedal.
Xbox Controller
PlayStation Controller
PC Gamepad
PC Mouse
You can rig any kind of device, just map keyboard key Space to bass and "K" key to Hi-hat.
For unique setups that might not work in-game, use Steams controller mapper tested and working with various hardware configs with VRDUS.

Foot Pedal Device
Pedals On Buttons (Default) VR Controllers
Both foot pedals bass and hi-hat button control is on the right controller primary and secondary button presses.
Pedals On Mouse
A mouse can be connected and the buttons can be used for bass and hi-hat pedals.
Pedals On Keyboard
Connect a keyboard to control pedals, use keyboard keys or map a custom keyboard controller.
Bass (Spacebar)
Hi-hat (K Key)
Independent Bass/Hat Pedal Buttons VR Controllers
If you wish to use pedals independently bass/hi-hat on separate controllers L/R go to the main and click the "Extra Settings" button. Check the box "Independent pedals" to move the bass pedal to the left controllers primary button while hi-hat stays on your right controller.
Double Bass Buttons VR Controllers
Main menu, Extra Settings, Double Bass.
Single Or Double Bass On Triggers VR Controllers
Main menu, Extra Settings, Double Bass On Triggers option.
Physical USB/Bluetooth Foot Pedals
Use this option only if you are having trouble using your USB pedal. The game should recognize your pedal at the start of the game without this option enabled or needed.
Device 1: button 1 bass / button 2 hi-hat
Device 2: button 1 hi-hat
Testers both PC and Quest were using PCsensor foot pedals, but any hardware should work similar.

PC Notes: We recommend "Single Press" if your hardware pedal has config software, but experiment with both.

Virtually any custom device can be configured on PC with proper remapping tools like Steams remapper which is included already in Steam. Below is a custom device, built from scratch, a 3D printed kick pedal wired to a custom USB controller circuit. This is one of many custom device that you can configure for use in the game, for hi-hat pedals or kicks, the choice is yours in the remapping settings. Use spacebar for kicks, K key for hi-hats.

DrHotwing custom USB PC.
Saving Kits and Settings
The simulator starts ups and loads a default prebuilt drum kit, this is for quick access players that just want to jump in and play, it may not be your style of kit. Visit the "Drum Builder" tab and press the "Clear Items" button. This will clear all items except the essentials like a ride cymbal and a hi-hat. You can also build onto any existing save and save it to any slot.

Click "Clear Items" to clear the drum kit.
"View Items" to start building.

Click and SAVE disk to save to that slot. You can shutoff the game and return later. Click the LOAD slot you saved too.
Once you have your kit setup and configured, even if you add new pieces later, head to the "Drum Builder" tab in-game and save, you have 5 slots, being slots 0-4, shown as disk.
The kit will be saved to your device as a single .bin file, you won't need to do anything more unless you want to backup the file, or share it.
CustomKitData.bin (Saves to PC) Each slot
SaveGameData.bin (Saves to Quest) Each slot
File Locations
The Slot# you select to save too is where the kit file will be saved and placed into that Slot# directory on your file system. Both PC and Quest use a single .bin file for each save. These .bin files are usually under 1MB in size, so they can easily be shared with others or posted on the internet or in the Discord.
If you want to backup, or share a kit file, other users can load it up and use it, your drum kit file is saved to your computer and your Meta Quest headset at the locations below.
Quest: android/data/com.aliencybercoat.vrdus/files/Slot#
PC: users\Username\AppData\LocalLow\Alien Cyber Coat\Slot#

(Optional) Fill in the kit name and description is optional. This is useful if you're sharing the kit with other people. You can write anything if Kit Name or Discription.
When you save a drum kit in-game and select the "Slot 0" disk it will save the file in a subdirectory labeled Slot_0.
Slot disk 1 saves to Slot_1
Slot disk 2 saves to Slot_2
Slot disk 3 saves to Slot_3
So on...
Build A Kit
Head to the "Drum Builder" tab and click the "View Items" button with your hand lasers, a menu will appear in your left hand, this is all the hardware in your collection. Reach into any of the item boxes with your right hand. Squeeze the grip trigger and pull out and item. Place it anywhere you wish. To configure any item more, press in your left controllers analog stick. This will enable "Edit Mode". While in edit mode you will see green gears appear next to each item. If the item has no custom options the gear will not appear. Touch any gear with your left hand to bring up that items "Mod Menu". The mod menu will list every option available to the item. If you are looking for what some of these custom settings do on each item, head to the Item Customization Options.

Load Other Players Custom Kits (Meta Quest)
When you save your drum kit to a save slot in-game, the entire kit, its configuration settings, and scene settings are are stored in single .bin file and saved to your Quest headset. These files are shared online or in Discord.
All your save files can be found on your Meta Quest located at android/data/com.aliencybercoat.vrdus/files
When you save a drum kit in-game to "Slot 0" it will save the file in a subdirectory labeled that. Slot 1 will be Slot_1 etc.
1.) Place The File
Locate where the game saves data too on your Quest headset at android/data/com.aliencybercoat.vrdus/files
Place the file in one of the Slot# directories.
Slots0-4 are the slots you save to with the disk icons.
Slot5-20 are presets, you don't want to replace these.
2.) Load The File
Start the game. Visit the "Drum Builder" tab. Click the corresponding Slot# in which you placed the "SaveGameData.bin" save file in.
You can now play, mod, this kit. Save it to any slot or rewrite it.
Multiplayer Test
Multiplayer test is included in v35.7+. The multiplayer test is in beta but can still be accessed in game. Main menu, multiplayer button. The mutliplayer browser menu will appear. Click the "Unnamed" box and enter your multiplayer username, this is the username other players will see above your players head and in the global chatbox. Now click start. The multiplayer browser list will appear with a list of games, or be blank if no servers are currently made. Click any to join. If you don't enter the game after you click a lobby, the host hasn't started the game, you can leave that lobby anytime by clicking leave game.
Join A Game
Click any of the active games in the list that are labeled "Quest".
Any player can play the multiplayer drum set, they just need to walk up to it. If you don't trust the players in your game, and are playing a show, some stage entrances may be blocked by a bouncer to protect the drummer.
You will not be able to use any drum controls while 15 or so feet away from the center of the drum set. You must walk to the center of the kit to be able to control them and set pedal settings. Walking away from the drum set in multiplayer mode will reset your pedal settings each time, when walking up to the kit, always set your pedal settings, enter the main menu and the "Extra Settings" tab.
Host A Game
When you are in the multiplayer browser, click the "+" button to start a lobby, enter the name of your new lobby and enter the max amount of players allowed to join. Click create. Your lobby is ready and now viewable by others with the game in the multiplayer game list. You can wait until some players join in your lobby, or you can press Start Game anytime. You can also start the game session without any players in your lobby, anytime, or wait to players join the lobby "pooling", and once you get enough players or the players you were waiting for, you can send everyone to an active game all at once by clicking the Start Game button. As the host, you have a special ability and can walk through walls and fly. All other players will be forced to walk around.
Any player can play the multiplayer drum set, they just need to walk up to it. If you don't trust the players in your game, and are playing a show, it's a good idea to grab a friend in game with you and have them play as a bouncer, and block the entrance to the stage, so no unwanted players can jump on the drum set in use.
You will not be able to use any drum controls while 15 or so feet away from the center of the drum set. You must walk to the center of the kit to be able to control them and set pedal settings. Walking away from the drum set in multiplayer mode will reset your pedal settings each time, when walking up to the kit, always set your pedal settings, enter the main menu and the "Extra Settings" tab.
When the host quits the game all clients will be kicked from the game.
Host Controls
If you look at your multiplayer game browser that follows you around in-game, you will see a dropdown box with a selection of songs, as the host you are also the DJ. Only you can select and play these songs, all other players in the game will hear the songs you choose, but the song dropdown list will be disabled for them, along with the volume slider.
Only host can choose a selected song in the song list.

Chatbox
The chat will enable once you enter an actove game. Anyone in that game can talk on chat. Your chat message will be displayed in the global chat for anyone in the room to see. See below for chat options.
(Global) Chat
Chat Option Will send your message in the global chat box everyone can see, it will also display your message above your players head in-game.
(Private) Chat
With private chat enabled, the message you send in chat will only displayed in a chat bubble above your players head. Your message will not sent to the global chat box, it will only be visible to you, in your chat. Private chat is a great way to talk to another player near to you in game, as your message will only be displayed above your players head in the game.
Changing Drum Sounds
Anyone can set the house drum set drums, hat, ride cymbal etc. to any sound they like, however you set your sounds on the house kit is how they will be heard by other players. This does not need to be changed each time if you are swapping the kit with other players. Every time you leave the kit or re-enter, your drum sounds you selected will be there, not the ones other players have set. When other players change the sounds, you will hear their custom selected sounds, enter Edit Mode just like normal, press in your left analog control stick. Place your left hand over and drum or cymbals mod gear and change the sound. Note: The drum heads and cymbals will not change visually for the clients, but they will hear the sound mods.
Jump
You can enable jump if you are a client, host cannot use this feature. It's mainly used to mimic active crowds, if enough players use it. Once enabled and both feet are on the ground, tap the left analog stick forward.
Note*
You will not be able to use any drum controls while 15 or so feet away from the center of the drum set. You must walk to the center of the kit to be able to control them and set settings. Walking away from the drum set in multiplayer mode will reset all pedal settings, enter the main menu and the "extra settings tab" and reset your pedal settings the first time you are on the multiplayer drum set, enable and disable the options you need. If you walk away your pedal settings will be reset and ready for the next user.
NOTICE --- Returning to SIngle Player
It's not recommended you return to single player after enabling multiplayer, instead soft reset the game with the soft reset button right on your multiplayer browser. This will unlink any multiplayer features that may bug the single player functions and quickly set you back at your drum set and a fresh game.
Passthrough (Meta Quest)


Main menu. Safe Passthrough.
Passthrough will allow you to use the drum kit and see your real environment and the real world around you. This can be helpful if you are playing a show, want to see what's going on around you while playing in-game, or just always wanted a drum kit some place in the real world. You can find the passthrough option in the main menu tab, see image below.
Safe Passthrough - This option is what you would choose if you don't want hand tracking to accidently enable while you're playing. It's the standard passthrough option and the one we recommend using.
Hand Tracking + Optional Passthrough - This option will enable both hand tracking and passthrough. Once enabled, double tap your controllers together to enable hand tracking, you can then place your controllers down and use just your real hands. I would only use this option if you want to try the hand tracking. We recommend using the "Safe Passthrough" option.
Drum anywhere with passthrough.
PCVR Technical
Q: Missing or delayed hits?
-
If you have to many lights or cameras enabled you can take a performance hit on your PC if your GPU/CPU can't handle it, causing the physics to get bottle necked while the PC drops frames.
Q: My hardware pedals work but sometimes they misfunction?
-
You can try to enable the (KMAP) option in the games settings menu under main/settings. Map your pedal as the spacebar.
-
If your pedals have software configuration for functionality please try its different modes with gameplay like single press or long press. We recommend single press. Please contact for more help. (See screenshot below)
Q: I rarely loose tracking and drumming?
-
Menu > Sticks > Cycle Physics will refresh physics and any errors with drumming.

Meta Quest Technical
Q: Can I run the Quest 3 120HZ refresh rate 3 mode?
-
VRDUS has been tested running in 120HZ. Although it will run you may encounter some in-game glitches or drum effects. It is recommend you run in the game in the default 90HZ.
Q: My hardware pedals work but sometimes they misfunction?
-
Enable the (KMAP) option in the games settings menu under main/settings. Map your pedal as the spacebar.
-
If your pedals have software configuration for functionality please try its different modes with gameplay like single press or long press. We recommend single press. Please contact for more help.
Q: I rarely loose tracking and drumming?
-
Menu > Sticks > Cycle Physics will refresh physics and any errors with drumming.
Q: I can't access my files?
-
If you are having trouble getting to your files make sure you have the "Read/Write" permission enabled for VRDUS on your apps permission in Meta Quest. If you are still having trouble accessing your files, place them on your Meta Quest in the location android/data/com.aliencybercoat.vrdus/files
Where do I get custom songs for note highway?
https://rhythmverse.co/songfiles/game/chm
This is just one of many sites on the internet that have Clone Hero music that includes drum notes. There are a handful of songs that come with the game but you must add custom songs yourself, you'll have to search around. Search Google or YouTube for "Clone Hero drum charts", or search your favorite song/band example "your favorite song clone hero drum chart" there is a large community of charters that post their work on the
net, some sites are dedicated to custom charters.
-
VRDUS supports most Clone Hero drum charts (.mid) and (.chart) both single-track and multitrack songs (songs with multiple audio files, drums, vocals, guitar and so on). Drums will be removed automatically for you if you use a multi-track song folder.
Most of these sites have listed or displayed what instrument notes comes with the song, technically called a "chart" or "beat map" of the song. Make sure you find the songs that have the drums included.
The example image below of a website and the details of the four random song listings. The second song has no drum notes, as we can see no drum icon... that song just has guitar notes, but the other three songs listed below do have drum notes, we can see the drum icon with its difficultly listed to the right of it.
Skip to How to add custom songs

We recommend difficulty 3 and below.
Playing Audio Files (.MP3 .OGG .WAV)
Main menu tab and select "Audio Player" use the file browser that appears to your left to find your audio files anywhere, select one to play it. If you want to restart the song, just select the file again in the browser and the song will restart.
Alternative Option: Meta Quest use any background app like the Quest browser to play audio from YouTube etc.

Scroll down like a phone screen, use your laser to grab the file browser and swipe up or down while squeezing the grip trigger, you can manually press the browsers arrow keys to scroll up or down. When you find your audio files in the browser, select one to have it start playing, reselect it anytime if you want to restart the song.
Use the "Go Up Directory" to access other areas of your Quest or PC. The in-game audio player supports .MP3 .WAV and .OGG audio files.

Q: Why is the music player not working in Meta Quest?
-
VRDUS need to access to your Meta Quest storage and access the file system. Make sure you have READ permission enabled on you device for VR Drums Ultimate Streamer in its permissions. To change permissions for an app on your Meta Quest, navigate to the app in your library, hover over it, click the three dots, and then select "Permissions" to toggle desired access like microphone or camera.
Other Options To Play Music:
-
Spotify
Open Spotify web player on Meta/Oculus browser, play any song, go to the game and then with a PC or phone hit play while Spotify is being connected to the web player.
-
Any Background App
YouTube Quest browser etc.
-
Casting
Casting your screen and game content is enabled on the Meta Quest version. Cast your game anywhere you like.
-
Line Splitter (Quest 2 Only)
Use a headphone split adapter from Amazon that allows you to connect the adapter to headset headphone jack and also a line in source for audio and also plug in your headphones.
